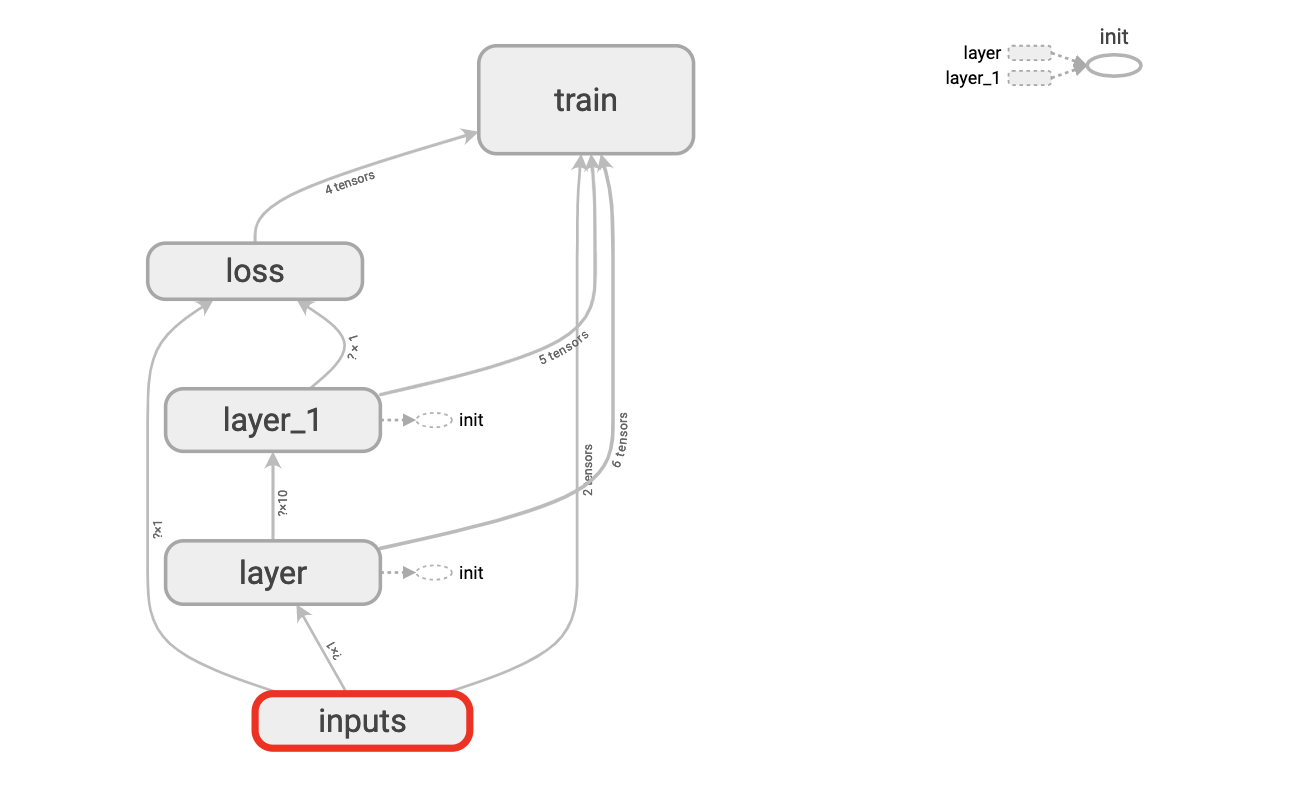
Tensorboard 神经网络结构可视化。Google Chrome 与 Tensorboard 兼容。
可视化效果

可视化步骤
用name参数为
x_in指定名称为x_in:1x_in = tf.placeholder(tf.float32, [None, 1], name='x_input')使用
with tf.name_scope('inputs')可以将x_in和y_in包含进来,形成一个大的图层,图层的名字就是with tf.name_scope()方法里的参数。1with tf.name_scope('inputs'):2x_in = tf.placeholder(tf.float32, [None, 1], name='x_input')3y_in = tf.placeholder(tf.float32, [None, 1], name='y_input')使用
tf.summary.FileWriter()将绘出的图保存在目录logs/中, 该方法的第二个参数为sess.graph, 因此要把本句放在获取session的后面。graph是将前面定义的框架信息收集起来放在指定目录下面。1sess = tf.Session() # 创建会话2writer = tf.summary.FileWriter('logs/', sess.graph) # 用tf.summary.FileWriter()绘图并保存3sess.run(init)运行改python程序
在Terminal中切换到项目目录下,执行下面命令:
1tensorboard --logdir logs在Google Chrome中打开Terminal中的网址即可查看。
Tensorboard 神经网络训练过程可视化
TensorFlow中提供了
tf.histogram_summary()方法绘制图片,第一个参数是图表名称,第二个参数是图表要记录的变量。loss在TesnorBorad的event下面,且我们使用
tf.summary.scalar()得到Loss变化图。tf.merge_all_summaries()方法会对我们所有的summaries合并到一起。用
writer.add_summary()记录训练的数据,merged 也需要run才能生效。运行改python程序
在Terminal中切换到项目目录下,执行下面命令:
1tensorboard --logdir logs在Google Chrome中打开Terminal中的网址即可查看。
完整可视化程序代码
1 | import numpy as np |
2 | import tensorflow as tf |
3 | |
4 | ''' |
5 | TensorFlow: 神经网络可视化 |
6 | ''' |
7 | |
8 | |
9 | # 构建一个神经层函数 |
10 | def add_layer(inputs, in_size, out_size, n_layer, activation_function=None): |
11 | layer_name = 'layer%s' % n_layer |
12 | with tf.name_scope(layer_name): |
13 | with tf.name_scope('weights'): |
14 | Weights = tf.Variable(tf.random_normal([in_size, out_size]), name='W') |
15 | tf.summary.histogram(layer_name + '/weights', Weights) # 绘制图片 |
16 | with tf.name_scope('biases'): |
17 | biases = tf.Variable(tf.zeros([1, out_size]) + 0.1, name='b') |
18 | tf.summary.histogram(layer_name + '/biases', biases) |
19 | with tf.name_scope('Wx_plus_b'): |
20 | Wx_plus_b = tf.matmul(inputs, Weights) + biases |
21 | if activation_function is None: # 激励函数为空 |
22 | outputs = Wx_plus_b |
23 | else: |
24 | outputs = activation_function(Wx_plus_b) |
25 | tf.summary.histogram(layer_name + '/outputs', outputs) |
26 | return outputs |
27 | |
28 | |
29 | # 导入数据 |
30 | x_data = np.linspace(-1, 1, 300, dtype=np.float32)[:, np.newaxis] |
31 | noise = np.random.normal(0, 0.05, x_data.shape).astype(np.float32) # 噪声 |
32 | y_data = np.square(x_data) - 0.5 + noise # 有噪声的一元二次函数 |
33 | |
34 | with tf.name_scope('inputs'): |
35 | x_in = tf.placeholder(tf.float32, [None, 1], name='x_input') # 用占位符定义神经网络的输入 |
36 | y_in = tf.placeholder(tf.float32, [None, 1], name='y_input') # 用占位符定义神经网络的输出 |
37 | |
38 | # 搭建网络 |
39 | # 隐藏层l1 |
40 | l1 = add_layer(x_in, 1, 10, n_layer=1, activation_function=tf.nn.relu) # 用add_layer()定义隐藏层 |
41 | # 隐藏层l2 |
42 | prediction = add_layer(l1, 10, 1, n_layer=2, activation_function=None) |
43 | |
44 | with tf.name_scope('loss'): |
45 | loss = tf.reduce_mean(tf.reduce_sum(tf.square(y_in - prediction), reduction_indices=[1])) # 计算误差 |
46 | tf.summary.scalar('loss', loss) # 绘制图片 |
47 | with tf.name_scope('train'): |
48 | train_step = tf.train.GradientDescentOptimizer(0.1).minimize(loss) # 训练以提升准确率,0.1为学习效率(通常小于1) |
49 | |
50 | init = tf.global_variables_initializer() # 初始化变量 |
51 | sess = tf.Session() # 创建会话 |
52 | merged = tf.summary.merge_all() # 合并所有训练图 |
53 | writer = tf.summary.FileWriter('logs/', sess.graph) # 用tf.summary.FileWriter()绘图并保存 |
54 | sess.run(init) |
55 | |
56 | # 开始训练 |
57 | for i in range(1000): # 让机器学习1000次 |
58 | # train_step是学习的内容 |
59 | sess.run(train_step, feed_dict={x_in: x_data, y_in: y_data}) |
60 | if i % 50 == 0: # 每50步输出学习误差 |
61 | rs = sess.run(merged, feed_dict={x_in: x_data, y_in: y_data}) |
62 | writer.add_summary(rs, i) # 记录 |
